Penetration testing
The sections below describe the essentials of how to use Burp Suite within your web application testing. For much more information about general techniques and methodologies for web application testing, please refer to The Web Application Hacker's Handbook, which was co-authored by the creator of Burp Suite.
Also in the Burp Suite Support Center:
The basics of using Burp
For help with installing and launching Burp, starting projects, and configuring display settings, please see the help on Getting started with Burp Suite.
To use Burp for penetration testing, you need to configure your browser to work with Burp, and install Burp's CA certificate in your browser.
Once you have Burp running and configured your browser, go to the Proxy Intercept tab, and ensure that interception is turned on (if the button says "Intercept is off" then click it to toggle the interception status). Then go to your browser and visit any URL.
Each HTTP request made by your browser is displayed in the Intercept tab. You can view each message, and edit it if required. You then click the "Forward" button to send the request on to the destination web server. If at any time there are intercepted messages pending, you will need to forward all of these in order for your browser to complete loading the pages it is waiting for. You can toggle the "Intercept is on / off" button in order to browse normally without any interception, if you require. For more help, see Getting started with Burp Proxy.
As you browse an application via Burp, the Proxy history keeps a record of all requests and responses. In the Proxy, go to the History tab and review the series of requests you have made. Select an item in the table and view the full messages in the Request and Response tabs.
Also, as you browse, Burp by default builds up a site map of the target application. Go to the Target tab, and the Site Map sub-tab, to view this. The site map contains all of the URLs you have visited in your browser, and also all of the content that Burp has inferred from responses to your requests (e.g. by parsing links from HTML responses). Items that have been requested are shown in black, and other items are shown in gray. You can expand branches in the tree, select individual items, and view the full requests and responses (where available). For more help, see Using the Target tool. You can control which content gets added to the site map as you browse, by configuring a suitable live scanning task.
At the core of Burp's penetration testing workflow is the ability to pass HTTP requests between the Burp tools, to carry out particular tasks. You can send messages from the Proxy intercept tab, the Proxy history, the site map, and indeed anywhere else in Burp that you see HTTP messages. To do this, select one or more messages, and use the context menu to send the request to another tool.
The Burp tools you will use for particular tasks are as follows:
- Scanner - This is used to automatically scan websites for content and security vulnerabilities.
- Intruder - This allows you to perform customized automated attacks, to carry out all kinds of testing tasks.
- Repeater - This is used to manually modify and reissue individual HTTP requests over and over.
- Collaborator client - This is used to generate Burp Collaborator payloads and monitor for resulting out-of-band interactions.
- Clickbandit - This is used to generate clickjacking exploits against vulnerable applications.
- Sequencer - This is used to analyze the quality of randomness in an application's session tokens.
- Decoder - This lets you transform bits of application data using common encoding and decoding schemes.
- Comparer - This is used to perform a visual comparison of bits of application data to find interesting differences.
You can combine Burp's different tools in numerous ways, to perform testing tasks ranging from very simple to highly advanced and specialized.
Testing workflow
Burp lets you combine manual and automated techniques effectively, gives you complete control over all of the actions that Burp performs, and provides detailed information and analysis about the applications you are testing.
Some users may not wish to use Burp in this way, and only want to perform a quick and easy vulnerability scan of their application. If this is what you need, please refer to Scanning web sites.
The diagram below is a high-level overview of the key parts of Burp's penetration testing workflow:
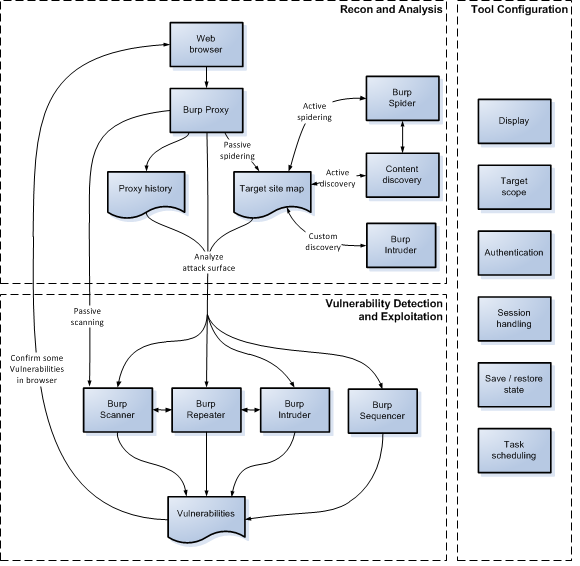
Recon and analysis
The Proxy tool lies at the heart of Burp's workflow. It lets you use your browser to navigate the application, while Burp captures all relevant information and lets you easily initiate further actions. In a typical test, the recon and analysis phase involves the tasks described below.
Manually map the application
Using your browser working through Burp Proxy, manually map the application by following links, submitting forms, and stepping through multi-step processes. This process will populate the Proxy history and Target site map with all of the content requested, and (via live scanning) will add to the site map any further content that can be inferred from application responses (via links, forms, etc.). You should then review any unrequested items (shown in gray in the site map), and request these using your browser.
Perform automated mapping where necessary
You can optionally use Burp to automate the mapping process in various ways. You can:
- Carry out automated scanning to crawl the application's content.
- Use the content discovery function to find further content that is not linked from visible content that you can browse to or spider.
- Perform custom discovery using Burp Intruder, to cycle through lists of common files and directories, and identify hits.
Note that before performing any automated actions, it may be necessary to update various aspects of Burp's configuration, such as target scope and session handling.
Analyze the application's attack surface
The process of mapping the application populates the Proxy history and Target site map with all the information that Burp has captured about the application. Both of these repositories contain features to help youanalyze the information they contain, and assess the attack surface that the application exposes. Further, you can use Burp's Target Analyzer to report the extent of the attack surface and the different types of URLs the application uses.
Tool configuration
Burp contains a wealth of configuration options, which it is often necessary to use at different stages of your testing, to ensure that Burp works with your target application in the way you require. For example:
- Display - You can configure the font and character set used to display HTTP messages, and also the font in Burp's own UI.
- Target scope - The target scope configuration tells Burp the items that you are currently interested in and willing to attack. You should configure this early in your testing, as it can control which items are displayed in the Proxy history and Target site map, which messages are intercepted in the Proxy, and which items may be scanned.
- Platform authentication - If the application server employs any platform level (HTTP) authentication, you configure Burp to handle the authentication automatically.
- Session handling - Many applications contain features that can hinder automated or manual testing, such as reactive session termination, use of per-request tokens, and stateful multi-stage processes. You can configure Burp to handle most of these situations seamlessly, using a combination of session handling rules and macros.
- Task scheduling - You can configure Burp to schedule tasks at given times or intervals, to allow you to work within specified testing windows.
Vulnerability detection and exploitation
After completing your recon and analysis of the target application, and any necessary configuration of Burp, you can begin probing the application for common vulnerabilities. At the stage, it is often most effective to use several Burp tools at once, passing individual requests between different tools to perform different tasks, and also going back to your browser for some tests. Throughout Burp, you can use the context menu to pass items between tools and carry out other actions.
In Burp's default configuration, it automatically performs live passive scanning of all requests and responses that pass through the Proxy. So before you begin actively probing the application, you might find that Burp Scanner has already recorded some issues that warrant closer investigation.
Burp's tools can be used in numerous different ways to support the process of actively testing for vulnerabilities. Some examples are described below for different types of issues.
Input-based bugs
For issues like SQL injection, cross-site scripting, and file path traversal, you can use Burp in various ways:
- You can perform scans using Burp Scanner. You can select items anywhere in Burp, and initiate scans using the context menu. Or you can configure Burp to do live scanning of all in-scope requests passing through the Proxy.
- You can use Burp Intruder to perform fuzzing, using your own test strings and payload positions.
- You can send individual requests to Burp Repeater, to manually modify and reissue the request over and over.
- Having identified some types of bugs, you can actively exploit these using Burp Intruder. For example, you can often use the recursive grep payload type to exploit SQL injection vulnerabilities.
Logic and design flaws
For issues like unsafe use of client-side controls, failure to enforce account lockout, and the ability to skip key steps in multi-stage processes, you generally need to work manually:
- Typically, a close review of the Proxy history will identify the relevant requests that need to be investigated.
- You can then probe the application's handling of unexpected requests by issuing these individually using Burp Repeater, or by turning on Proxy interception and manually changing requests on the fly while using your browser.
- You can actively exploit many logic and design flaws using Burp Intruder. For example, Intruder can be used to enumerate valid usernames, guess passwords, cycle through predictable session tokens or password recovery tokens, or even simply to reissue the same request a large number of times (using the null payloads type).
- Having confirmed a logic or design flaw, many of these can be actively exploited by using Burp Proxy's match/replace function, or session handling rules, to change requests in systematic ways.
Access control issues
Burp contains several features that can help when testing for access control vulnerabilities:
- You can use the Compare site maps function for various tasks, including: identifying functionality that is visible to one user and not another; testing whether a low privileged user can access functions that should be restricted to higher privileged users; and discovering where user-specific identifiers are being used to segregate access to data by two users of the same type.
- You can use different browsers to access the application in different user contexts, and use a separate Burp Proxy listener for each browser (using different ports). You can then open additional Proxy history windows (via the context menu) and set the display filter on each window to show only items received on a specific listener port. As you use the application in each browser, each history window will show only the items for the associated user context. You can then use the "Request in browser in current browser session" function (via the context menu) to switch requests between browsers, to determine how they are handled in that browser's user context.
- Many privilege escalation vulnerabilities arise when the application passes a user identifier in a request parameter, and uses that to identify the current user context. You can actively exploit this type of vulnerability by using Burp Intruder to cycle through identifiers in the appropriate format (e.g. using the numbers or custom iterator payload types) and configuring extract grep items to retrieve interesting user-specific data from the application's responses.
Other vulnerabilities
Burp contains functions that can be used to deliver, and often automate, virtually any task that arises when probing for other types of vulnerabilities. For example:
- You can review the contents of the Target site map for information leakage issues, using the Search and Find comments functions to assist you.
- Having identified a possible CSRF vulnerability, you can use the CSRF generator to quickly create a proof-of-concept attack in HTML, then use the "Test in browser" function to load the attack into your browser, and then review the browser results and Proxy history to verify whether the attack was successful.
- You can use Burp Sequencer to analyze a sample of session tokens from the application, and estimate the quality of their randomness.
- For some types of encrypted session tokens or other parameters, you can use the bit flipper and ECB block shuffler payload types in Burp Intruder to blindly modify the encrypted data in an attempt to meaningfully change the decrypted data that the application processes.
- You can write your own custom Burp extensions to carry out more specialized or customized tasks.
Read more
There is extensive documentation for all of Burp's tools and features, and the typical workflow you need to use when testing with Burp.
Use the links below for help about using each of the main Burp tools: